Pages

Friday, September 25, 2015

Throw Pillows

This is the story of how we made 5 throw pillows for less than 25 dollars. 
It's a short story because it was a super extra simple project.
P.S. I really need to retake this picture now that my diploma is on the wall too, but what are the odds I can get Swarlie to pose so perfectly again??

Aren't they pretty???

This was the easiest project ever, I promise! It was also crazy cheap, especially considering how good they look on our couch now. If I do say so myself. ;)

All we did was take two different fabrics, and cut them each into two 18"x18" squares. 

I sewed around the edges, being sure to backstitch on the corners for stability and then I turned them inside out and stuffed them. I butchered old pillows that we were going to throw out anyways and used the fluff as filling for our brand new happy pillows. I sewed up the remaining hole in the pillow by hand and that's it! So easy, and so fun. And SO cheap. We got the fabric 50% off and since the old pillows were FO FREE it came out to $25 for 5 pillows. And we still have fabric to spare! 

 Although if you take a nap on them your face will look like this. Well, not this handsome, but you get what I mean. ;)

So here is  a recap of things we still want to do in this room:
-Hang My Diploma Done!
-Build a side table for between the couch and chair. (Preferably along like the one I talk about in this post.) Our lamp will live on that table and I hope that our marquee letter T (this post) will look good up there too. It's currently standing in a corner. No one puts baby in a corner. 

Completely irrelevant but important sidenote: Does anyone else discuss the fact that Baby is reaaaally not actually in a corner, EVERY time they watch that movie? Or is that just the Beardens....

-Decide if I want to knit a blanket for the couch. I want to, but do we need two blankets out? I really love the blanket on the chair and I'm not willing to put that one away. 
-Build a very slim table for between the door and the couch. To put sunglasses, hats, etc. on when you walk in the door.
-An area rug. But of course we haven't found on we like. 

It's an ongoing process, but that's the best part about it!

Tuesday, September 22, 2015

Dresser Repaint - Part Two

Its done! To be honest, it was done before I even posted the first page about it, but we didn't have all of the knobs, so I couldn't post an after. :)

Of course, the day after the knobs at Hobby Lobby were 50% off, we picked out what we wanted. Being me, I couldn't pay full price RIGHT after they were on sale so I made Landan take a million trips to Hob Lob with me so that we could each use a 40% off coupon. You know how I've said in the past that he's a wonderful man? This man somehow made it through the line three, THREE different times at the same store with a coupon. 

Ladies, if you ever meet a man that can use five 40% off coupons (yup, two different stores, 5 coupons) in one day, marry that man. 

But not this one, because he's taken. :)

 So we left off without any paint, in this post

Also, before I go any further, I have an update on our sweet little dresser's history. My mammaw informed me that my great grandparents bought this (and the bed and desk that goes with it) when they married. IN 1930!! How cool is that? I'm even more in love now that I fully know this little guy's story. 
First we did the drawers. In this picture, they may not look different to you, but TRUST ME. So different! The old color was off white, dingy, and chipped. It is now bright white, with a satin finish that I love more than life it self!
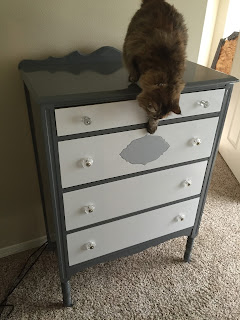
Next we did the outer part. If you knew how much time I spent looking at dressers with gray drawers and white outside and vice versa trying to decide, you would laugh at me. But you know what? I don't even care because LOOK HOW PRETTY. 

Here is the top after just the first coat, we had to do a few more on it but it turned out so nicely. Also, we butchered all of our moving boxes and taped them together so we could have a place to spray paint them at our apartment. I bet our neighbors all hate us, between the painting and the power tools, (in this post). ;)

Can you hear them? The angels are singing. 

This picture has terrible lighting but it's what we *almost* chose for the knobs. The top is a smallish glass knob, and the rest of the drawers were going to be this really pretty dark gray. We brought home two to see if we liked them, and I'm glad we did. The more I looked at it the more I felt that there was too many different shades of gray going on. So we went back to Hobby Lobby and came home with THESE!
ARENT THEY PRETTY?

So here, in all it's glory, is the finished project. :)


And here, for your viewing pleasure, is my (failed) attempt to get Swarlie to sit on top of it for a photo shoot. 


Thursday, September 17, 2015

Upholstered Headboard - DIY

I know I have two unfinished projects to update you on, and I promise I will. But, I am way too excited to wait to show you this! Even though both the dresser (here) and the jewelry box (here) are finished, my impatience is getting the best of me for now. 

Let me just try to contain my excitement long enough to get some words out about this project. This was so much fun. I saw this tutorial on my favorite blog ever, here. (Seriously I think we should be best friends, we are both named Kelly/Kellie and I totally get her humor, and I love almost everything she does) We literally just copied this exactly. I was nervous, because she said this was a rough shape to upholster, but whether it was her warnings and tips, or just luck, it was not bad at all. We started this project and were done with it in less than 24 hours, including gathering all the supplies. 
Landan measured and cut out the shape using the directions from the blog I linked to above. To me that looks crazy intricate and stressful but he did it with no sweat. On the back of his truck. In our apartment parking lot. While I apologized to people walking by for the noise. If they could only see how pretty it turned out I'm sure they'd forgive us. ;)

For the batting, we used a foam mattress topper as a substitute. It was far cheaper and it was already cut for us, so it was a win win. 
With the foam stapled on, we did the same process and stapled on the white muslin as a lining fabric. Kelly from View Along the Way said that the lining fabric serves as a "practice" for applying the nice fabric. She was SO right. By the time we did the foam, and lining, the last piece of fabric was a breeze. We were a well oiled machine by that point and everything went beyond smoothly. 

Although, that being said, there is no way you could convince me to do this by myself. I'm telling you, a minimum of four hands is required, and unless you can pull that off alone somehow, you really need a buddy. 

See my artsy "nailhead trim" picture? Yep, you're jealous of my photography skillz, I know it. 

This part was a little stressful because we knew it would be very obvious if we made a mistake but we just measured each one (you only have to nail in 1 out of every 5 nails) before hammering it. But LOOK!

Not to brag or anything, but ISN'T IT AMAZING???

If you need us, we will be patting ourselves on the back. :)
Tuesday, September 15, 2015

Dresser Repaint - Part One

Let me start with the before. 


Doesn't it look like it belongs in a seven year old's room? Yup. That's because we painted it when I was seven. That's part of the reason I love this dresser so much. My mom and I (let's be real, I was a tiny child so it was probably all her) repainted all of my furniture when it was given to me by my great grandmother when I was little. It was peach colored when it lived in her home. And underneath all of the paint we found an olive green color, so we are not the first to strip off old paint and add new to this little gem. 


I am SO excited about this. And only about 80% of my excitement is due to the fact that Landan did all the hard work and I got to do the fun parts. No, seriously, I got home from work and my dresser looked like this. 
(PS we need curtains.)

He's amazing. If you cant tell in the picture, he did all the hard parts and left me one super easy side to scrape the paint off, because it's fun. He also knew I would want to feel like I helped. Yup. He even got it started for me, that's what he's doing in the picture. Sorry, ladies. He's taken. 
See the olive green that I was talking about? I wonder how long ago it was painted that color. 

Oh! And did I mention he remembered to take these before pictures for me because he knew I would want them? I've got a real keeper. :) 

I can't wait to share it with you when it's completed! 
Saturday, September 12, 2015

Jewelry Box - Part One

I'm splitting this up into a couple posts, because it's just a lot of information. Or, it's because I'm just really excited to share it even though it's not done. Yup. That's it. 
I made this jewelry box a couple of years ago and it did the job decently. But it definitely had flaws. 


Issues:
1. The way we hung it was stupid so I either needed new hardware or a different box. Wonder what won?
2. There was no where to put stud earrings. Sure, I could just throw them in the box but that's not very neat/tidy/effective. 
3. My watches had no home, probably because at the time I had exactly *one* watch.
4. I saw some cute drawer knobs on clearance at Hobby Lobby and I really wanted them but had nothing to do with them. 

I looked on pinterest some, but AS USUAL not one of them was everything that I wanted. So I laid out my (sad and small) collection of jewelry so that I could get an idea of sizes and measurements. I ended up deciding I needed about 14 by 20 of space. I wanted to construct a shallow box to hang on my wall, this time displaying the jewelry IN the box instead of ON it. 


I stole all the hardware right off of the old box. I spray painted it gold, obviously, because I'm me and I have a genuine obsession with gold. It's getting out of hand.

Also, when you live in an apartment, you have to be creative about spray painting. The people who work here are probably a lot more strict about having their grass spray painted gold by accident than my parents are. So I ended up getting a basket and lining it with foil and painting in the bottom of the basket. Even though I personally liked the gold grass. ;) And then I decided that I want to eventually paint that basket. But that is another project for another day. 


To finalize the measurements for the hooks and knobs, I laid out all my jewelry again and used a tape measure (and my pitiful attempt at a ruler, as seen in this post).

And that's where I'm at! 

Next up:
-Paint (I lost my paintbrushes, so I either need to buy more or figure out where I packed them.) I'm definitely going to use the same paint I used two years ago because I still stand by that choice. As long as I have enough of it left. 
-Find new screws for the gold (formerly black) knobs. The original ones stick out from the back of my box and definitely will not work. 
-Actually buy those pretty drawer pulls I have my heart set on from Hobby Lobby. I'm crossing my fingers that they are still there.

Wednesday, September 9, 2015

Makeup Bag


Let me start this by saying: I'm not a very experienced sewer, so if I can do it SEW CAN YOU! (See what I did there??)
PSA: There are a lot of pictures here. A lot. Sowwy. 

Being the extremely frugal person I am, (and was raised to be, Shoutout: Mom and Dad!) I am always looking for a less expensive way to get what I want. Maybe that's what makes DIY projects appeal to me. Or, maybe I'm too high maintenance to just buy something as is, even if it's not *perfect*. Probably both.

 I looked for tutorials online and none of them were exactly what I wanted to do. Until I ended up finding one tutorial for a bag I liked, and it was LITERALLY just pictures. Now don't get me wrong. Pictures are great. 1000 words and all that crap, but ya girl needs more help than that. I attempted it on my own once and I got this. Can you see how small it is??? It's barely big enough for my (very small) collection of jewelry.

This sad, sad small tiny doll person bag. The whole point was to make something my Naked 2 eyeshadow would fit in. Not going to cut it. This is where WORDS and MEASUREMENTS would have helped me. Although I guess if I successfully made a bag, the tutorial couldn't have been completely bad. I'm probably just being a diva about it, to be honest, but here are pictures AND instructions for anyone else who wants to attempt this.


Materials:
Fabric for Outside: 1/2 yard
Fabric for Inside: 1/2 yard
Interfacing: 1/2 yard (preferable iron on. Make it easier on yourself!)
Zipper: 16 inch (you may be able to get away with a 14 but I need more room for error, oops)
Thread: Obviously.


First, cut all of your material into rectangles, 8 x 14 inches. The pretty outer fabric, the inner fabric (which is also pretty, I'm sure. Equality, people!) and the interfacing. Pat yourself on the back because cutting fabric is awful, hellish torture.


We moved over two weeks ago, and yet I still haven't found my ruler or yardstick. So I made it work with some extra wood and a tape measure! :) 

Next, iron your interfacing onto the BACK of the INSIDE fabric. Trust me on this. If you iron it onto the outer fabric, it looks awful. (See above: mini makeup bag disaster) If you can't tell, the outside looks wrinkled and the inside looks beautiful. Obviously we want the outside to look the best so iron onto the inside.

Now. Take the outer piece. Lay it face up on the table. Put the zipper face down, on top of it. line up the TOP edge of the zipper, with the top edge of the outer fabric. Put the inner fabric face down on top of that, lining it up as well, so your ironed on interfacing is looking up at you, begging you to sew it into something pretty. 
                                                             Pink: Outside facing up
White: Interfacing facing up
Laptop: Netflix, Parks and Recreation. Wussup.

Sew along the top edge of the zipper. Make sure not to get your seam all up on the zipper or else it won't open and close well and you'll hate yourself for not making sure it zipped right before you sewed the whole thing. 

Can we also pretend I painted my nails for these pictures? Thanks. 

Now do the same thing with the other side. If you're nervous just look at it and make sure that when it's unfolded, your insides will face one another and your outsides will not. Also take note that since you flipped it over, your zipper is now face up.

Now put the outer sides together. They're faces should touch. Outer fabrics sitting in a tree. K-I-S-S-I-N-G. You will see the fabric side of the two inner sides sew along the bottom. By that I mean, parallel to the zipper, but on the opposite end of the bag. 

Take the zipper and the seam you just sewed and put them together. Theres really no way to explain it, so heres a picture. The bottom seam is directly underneath the zipper. 
In the photo above, you can see that I'm about to sew down the right side of the bag. Do it. Flip that bad boy over and sew down the left side too. YOU ARE ALMOST DONE. YOU CAN DO IT. 

This sounds complicated but you can totally handle it. I mean come on, you've made 4/5 of a bag by now! What can't you do??? Take the left side and smooth is towards the bottom. You're making a point here. 

Next, measure 2.5 inches down on each side. Draw a line between those points and sew across it. Then cut off the point. I only took one picture of that process, for efficiency. (Meaning: I forgot to take other pictures.)


It should looks like this once you do all four ends. Now turn it right side out and enjoy. You can iron some seams if you want but don't get too crazy or it will look like a kleenex box. (Thanks for the feedback, Kate!)

I'm going to use the first one I made to show you the finished product because it has the pretty monogram (made with a Silhouette machine, will post about it in the future), and this one doesn't. Maybe I shouldn't live 3 hours away from the person with the Silhouette machine. (Hi, Mom!) 


Disclaimer: The bag I just made is definitely going to be a gift so if one of you reading this post receives this gift, pretend to be seeing it for the first time. (Another reason the monogram isn't on it yet... I don't want to spoil the surprise!)


Sunday, September 6, 2015

Apartment Tour

Since I've been working on so many projects for decorating and organizing our new home, I thought I would take a moment to post some pictures of what it looks like completely bare. These pictures aren't the greatest, I literally snapped them in about five seconds between bringing my cat up the stairs and starting to unload the trucks/trailer. (Which was awful. Texas heat: You Suck.)

It will be so fun to look back on these as we get more and more settled in, to see how far our first little home together has come. 


When you walk in, you see this ADORABLE little archway cutout. Our TV stand is there currently, but it doesn't fit right so it looks ridiculous. Landan has drawn up a plan for what it will look like, all we have to do is make it. One drawback of an apartment is that we have much less space for DIY projects.

Next to the arch is our breakfast nook. It currently houses the table and chairs that we repainted and they look AMAZING. They fit right into the space and look even better than I hoped they would. I plan to do a post on them soon! 

Opposite the breakfast nook is our kitchen. It may look small, but compared to Landan's last kitchen, it's huge. We enjoy cooking together but it was legitimately difficult to even stand in there together, so to us this is a giant upgrade, whoop! 

Now turning around, if you are facing the TV cutout and turn to your left, you'll see our sunroom. It's amazing and I love every thing about it. We put my desk there so it'll be a nice little cubby for me to study in when I start nursing school in January. 

 Now I didn't take any pictures of the bedroom for some reason, but I did snap one of the closet. Isn't it pretty?!?!?! If you saw my scarf storage post, that space is the wall you can't see in this photo. It's to the direct left of the doorway that this picture is being taken through. You can see my side in this photo, Landan's side is the same, except not quite as deep. We really want to add more shelving on that back wall. It's not very functional this way, and we could both use more storage space, we just haven't figured out exactly what we want just yet. 

Well that's it! I hope to keep you guys updated on progress of our decorations and furniture. Hopefully there are lots of DIY posts to come!