Pages

Wednesday, October 7, 2015

One Month in Blog land


I cannot believe I have actually kept up with this blog for a month now! It's been in existence for about 2 years, but I haven't exactly been posting regularly... Or at all, at any point during those 2 years. 

 I know that I mostly post about our DIY's and crafts but I also want to take the time to post a little update on our lives. This snapchat form my other half pretty much sums it up.


When we moved here, Landan had been working for the fire department for a few weeks doing training and orientation, but was just starting on an actual shift. One month in and he finally caught his first actual fire yesterday. Obviously not a great day for the car owner, but it was a great day for Landan to finally get to put his skills to use!

I have visited him at work a couple of times and I won't even start to pretend that I'm too cool to sit in the fire truck and turn on the sirens. It was really freaking cool. Obviously I had to wear Landan's helmet the whole time.  I'm so grateful to everyone at the department for being so kind and for eating all the baked goods I've made for them. I am a person who hates baked goods but loves to bake, so it's really nice to be able to make pumpkin muffins on a whim and not have to eat pumpkin muffins for the next 12 breakfasts in a row. 

I've been working at Justice for the last four weeks as well. This was my high school job and although this time around I'm in a management position, I still felt like it would be the perfect, peppy place for me to work during my next year and a half as a nursing school student. 
(PS if you saw Landan's Facebook post calling me out for being a huge diva about boots, those are them! Now you understand why I was so hell-bent on finding them. Between the boots and the good hair day I was having I felt a work selfie was justified.)
Soooooomeone decided it was a good idea to wake me up at 6:30 am last week to go watch the sunset from the Seawall. There was a promise of coffee so I was totally on board. I'm so glad he thought of this because it was absolutely beautiful, and also COLD. 
We are freezing in this picture, and believe it or not we were JUST on the beach less than 24 hours before this picture was taken in swim trunks and a bikini. I'll let you draw your own conclusions on who was wearing which. ;)

I have really enjoyed these past few weeks of sharing my little projects and fun day stories with every one! I'm so grateful for anyone who takes the time out of their busy day to check on Landan, Swarlie and I. Please keep coming back to see how and what we are doing!

Thanks and gig em, Yall! 
Saturday, October 3, 2015

Engagement Photo Prop - Wooden Sign

Another one of my favorite DIY's for the engagement photos was our sign. I wasn't sure what I wanted to do exactly, because while chalkboards are fun and cute, I feel like I've seen them EVERY WHERE.  I don't know about you but there is only so much room for chalkboard paraphernalia (definitely had to spell check that word, no shame) in my life. I wanted to be a little different so I'm steering clear of all wedding things involving chalk. 
I was lucky enough to be able to find this sign already put together at Hobby Lobby in the wood section. 

I'm not talented enough to freehand lettering, so I had my mom cut out a stencil for me with her Silhouette. That thing is magic, I tell ya. I was able to use it to paint the lettering on. I should have sanded the wood some in order for the paint to go on smoother, but I liked the color and was afraid of losing some of that aged quality. 

Of course, I had to get my Swarlie cat involved in the pictures somehow. (First cat our photographers ever had at a session! Not sure how proud of that I should be...) Unfortunately I was unable to find a small version for her to hold, (ha), so I purchased some of Hobby Lobby's precut tiny, little, wood strips and hot glued them in the exact style of the larger one. It's pretty obvious in the picture that white was NOT the color to go with on her sign, it's almost illegible. If you can't read it, it says, "Me Too!"


This is one of my favorite parts of our shoot, because it has my guy's name on it, which is almost my name (eek!), and it's something I was able to make. Even if anyone takes my advice and makes their own, we will all end up with unique keepsakes that are special to us alone!

I also want to take a moment to talk about our photographers. First of all, as you can see by these photos, they are beyond talented. However, they are also two of the kindest people ever. From the first time I met with them for a consultation, I knew we made the right choice. Tony and Elena made the engagement pictures so much fun, which is really saying something, since we took these photos in a semi-crowded town, on Easter Sunday, with people literally staring at us the whole time. (Granted, we wanted to do them early in the morning when we could have the town to ourselves, but Landan and I were in the middle of school/EMT rotations in College Station so Tony and Elena were nice enough to meet us there on Easter while we were both in town.) Neither of us had any experience with professional photos but we felt comfortable through the entire experience. My bridal pictures are coming up next week and I can't wait to see Tony and Elena again! For their website, click here. If you want to see our entire set of engagement photos, they can be found (along with all of their other amazing work) at their blog, here.

 If you have any questions about how this sign was made, please don't hesitate to ask! What have you made to use as a prop in photos?


Friday, September 25, 2015

Throw Pillows

This is the story of how we made 5 throw pillows for less than 25 dollars. 
It's a short story because it was a super extra simple project.
P.S. I really need to retake this picture now that my diploma is on the wall too, but what are the odds I can get Swarlie to pose so perfectly again??

Aren't they pretty???

This was the easiest project ever, I promise! It was also crazy cheap, especially considering how good they look on our couch now. If I do say so myself. ;)

All we did was take two different fabrics, and cut them each into two 18"x18" squares. 

I sewed around the edges, being sure to backstitch on the corners for stability and then I turned them inside out and stuffed them. I butchered old pillows that we were going to throw out anyways and used the fluff as filling for our brand new happy pillows. I sewed up the remaining hole in the pillow by hand and that's it! So easy, and so fun. And SO cheap. We got the fabric 50% off and since the old pillows were FO FREE it came out to $25 for 5 pillows. And we still have fabric to spare! 

 Although if you take a nap on them your face will look like this. Well, not this handsome, but you get what I mean. ;)

So here is  a recap of things we still want to do in this room:
-Hang My Diploma Done!
-Build a side table for between the couch and chair. (Preferably along like the one I talk about in this post.) Our lamp will live on that table and I hope that our marquee letter T (this post) will look good up there too. It's currently standing in a corner. No one puts baby in a corner. 

Completely irrelevant but important sidenote: Does anyone else discuss the fact that Baby is reaaaally not actually in a corner, EVERY time they watch that movie? Or is that just the Beardens....

-Decide if I want to knit a blanket for the couch. I want to, but do we need two blankets out? I really love the blanket on the chair and I'm not willing to put that one away. 
-Build a very slim table for between the door and the couch. To put sunglasses, hats, etc. on when you walk in the door.
-An area rug. But of course we haven't found on we like. 

It's an ongoing process, but that's the best part about it!

Tuesday, September 22, 2015

Dresser Repaint - Part Two

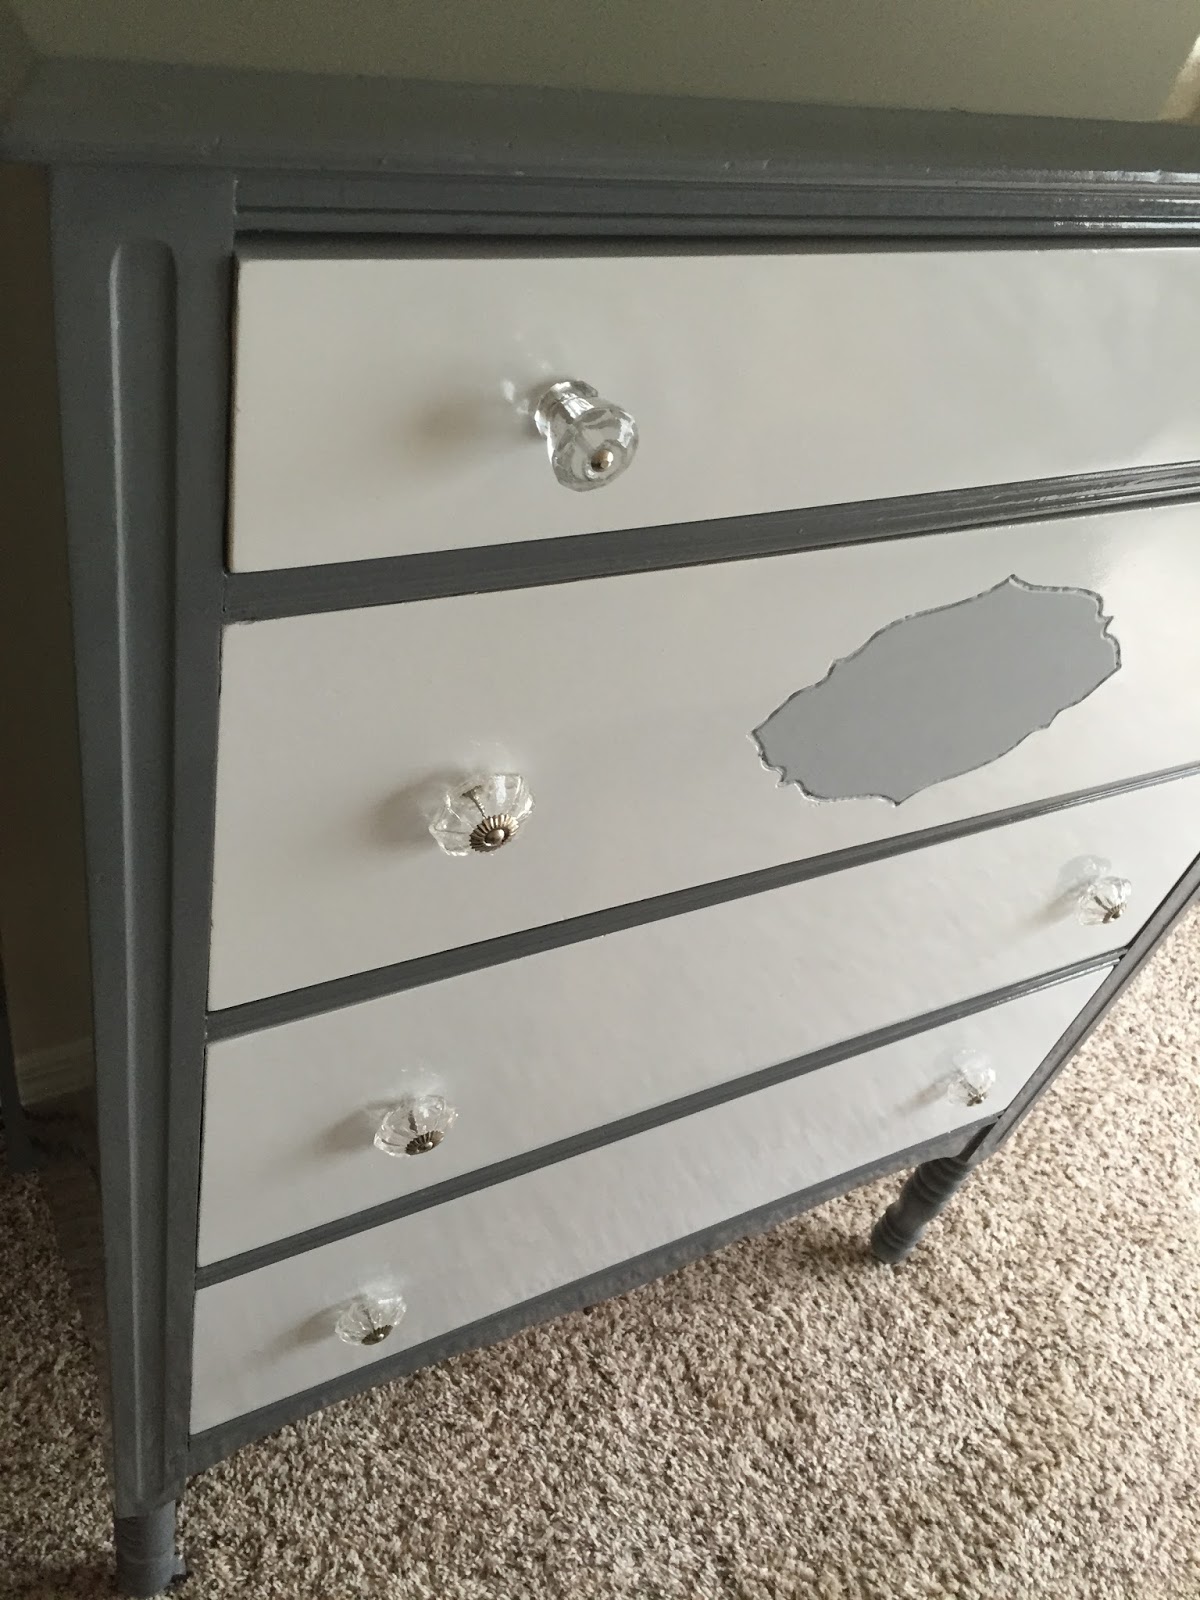
Its done! To be honest, it was done before I even posted the first page about it, but we didn't have all of the knobs, so I couldn't post an after. :)

Of course, the day after the knobs at Hobby Lobby were 50% off, we picked out what we wanted. Being me, I couldn't pay full price RIGHT after they were on sale so I made Landan take a million trips to Hob Lob with me so that we could each use a 40% off coupon. You know how I've said in the past that he's a wonderful man? This man somehow made it through the line three, THREE different times at the same store with a coupon. 

Ladies, if you ever meet a man that can use five 40% off coupons (yup, two different stores, 5 coupons) in one day, marry that man. 

But not this one, because he's taken. :)

 So we left off without any paint, in this post

Also, before I go any further, I have an update on our sweet little dresser's history. My mammaw informed me that my great grandparents bought this (and the bed and desk that goes with it) when they married. IN 1930!! How cool is that? I'm even more in love now that I fully know this little guy's story. 
First we did the drawers. In this picture, they may not look different to you, but TRUST ME. So different! The old color was off white, dingy, and chipped. It is now bright white, with a satin finish that I love more than life it self!
Next we did the outer part. If you knew how much time I spent looking at dressers with gray drawers and white outside and vice versa trying to decide, you would laugh at me. But you know what? I don't even care because LOOK HOW PRETTY. 

Here is the top after just the first coat, we had to do a few more on it but it turned out so nicely. Also, we butchered all of our moving boxes and taped them together so we could have a place to spray paint them at our apartment. I bet our neighbors all hate us, between the painting and the power tools, (in this post). ;)

Can you hear them? The angels are singing. 

This picture has terrible lighting but it's what we *almost* chose for the knobs. The top is a smallish glass knob, and the rest of the drawers were going to be this really pretty dark gray. We brought home two to see if we liked them, and I'm glad we did. The more I looked at it the more I felt that there was too many different shades of gray going on. So we went back to Hobby Lobby and came home with THESE!
ARENT THEY PRETTY?

So here, in all it's glory, is the finished project. :)


And here, for your viewing pleasure, is my (failed) attempt to get Swarlie to sit on top of it for a photo shoot. 


Thursday, September 17, 2015

Upholstered Headboard - DIY

I know I have two unfinished projects to update you on, and I promise I will. But, I am way too excited to wait to show you this! Even though both the dresser (here) and the jewelry box (here) are finished, my impatience is getting the best of me for now. 

Let me just try to contain my excitement long enough to get some words out about this project. This was so much fun. I saw this tutorial on my favorite blog ever, here. (Seriously I think we should be best friends, we are both named Kelly/Kellie and I totally get her humor, and I love almost everything she does) We literally just copied this exactly. I was nervous, because she said this was a rough shape to upholster, but whether it was her warnings and tips, or just luck, it was not bad at all. We started this project and were done with it in less than 24 hours, including gathering all the supplies. 
Landan measured and cut out the shape using the directions from the blog I linked to above. To me that looks crazy intricate and stressful but he did it with no sweat. On the back of his truck. In our apartment parking lot. While I apologized to people walking by for the noise. If they could only see how pretty it turned out I'm sure they'd forgive us. ;)

For the batting, we used a foam mattress topper as a substitute. It was far cheaper and it was already cut for us, so it was a win win. 
With the foam stapled on, we did the same process and stapled on the white muslin as a lining fabric. Kelly from View Along the Way said that the lining fabric serves as a "practice" for applying the nice fabric. She was SO right. By the time we did the foam, and lining, the last piece of fabric was a breeze. We were a well oiled machine by that point and everything went beyond smoothly. 

Although, that being said, there is no way you could convince me to do this by myself. I'm telling you, a minimum of four hands is required, and unless you can pull that off alone somehow, you really need a buddy. 

See my artsy "nailhead trim" picture? Yep, you're jealous of my photography skillz, I know it. 

This part was a little stressful because we knew it would be very obvious if we made a mistake but we just measured each one (you only have to nail in 1 out of every 5 nails) before hammering it. But LOOK!

Not to brag or anything, but ISN'T IT AMAZING???

If you need us, we will be patting ourselves on the back. :)
Tuesday, September 15, 2015

Dresser Repaint - Part One

Let me start with the before. 


Doesn't it look like it belongs in a seven year old's room? Yup. That's because we painted it when I was seven. That's part of the reason I love this dresser so much. My mom and I (let's be real, I was a tiny child so it was probably all her) repainted all of my furniture when it was given to me by my great grandmother when I was little. It was peach colored when it lived in her home. And underneath all of the paint we found an olive green color, so we are not the first to strip off old paint and add new to this little gem. 


I am SO excited about this. And only about 80% of my excitement is due to the fact that Landan did all the hard work and I got to do the fun parts. No, seriously, I got home from work and my dresser looked like this. 
(PS we need curtains.)

He's amazing. If you cant tell in the picture, he did all the hard parts and left me one super easy side to scrape the paint off, because it's fun. He also knew I would want to feel like I helped. Yup. He even got it started for me, that's what he's doing in the picture. Sorry, ladies. He's taken. 
See the olive green that I was talking about? I wonder how long ago it was painted that color. 

Oh! And did I mention he remembered to take these before pictures for me because he knew I would want them? I've got a real keeper. :) 

I can't wait to share it with you when it's completed! 
Saturday, September 12, 2015

Jewelry Box - Part One

I'm splitting this up into a couple posts, because it's just a lot of information. Or, it's because I'm just really excited to share it even though it's not done. Yup. That's it. 
I made this jewelry box a couple of years ago and it did the job decently. But it definitely had flaws. 


Issues:
1. The way we hung it was stupid so I either needed new hardware or a different box. Wonder what won?
2. There was no where to put stud earrings. Sure, I could just throw them in the box but that's not very neat/tidy/effective. 
3. My watches had no home, probably because at the time I had exactly *one* watch.
4. I saw some cute drawer knobs on clearance at Hobby Lobby and I really wanted them but had nothing to do with them. 

I looked on pinterest some, but AS USUAL not one of them was everything that I wanted. So I laid out my (sad and small) collection of jewelry so that I could get an idea of sizes and measurements. I ended up deciding I needed about 14 by 20 of space. I wanted to construct a shallow box to hang on my wall, this time displaying the jewelry IN the box instead of ON it. 


I stole all the hardware right off of the old box. I spray painted it gold, obviously, because I'm me and I have a genuine obsession with gold. It's getting out of hand.

Also, when you live in an apartment, you have to be creative about spray painting. The people who work here are probably a lot more strict about having their grass spray painted gold by accident than my parents are. So I ended up getting a basket and lining it with foil and painting in the bottom of the basket. Even though I personally liked the gold grass. ;) And then I decided that I want to eventually paint that basket. But that is another project for another day. 


To finalize the measurements for the hooks and knobs, I laid out all my jewelry again and used a tape measure (and my pitiful attempt at a ruler, as seen in this post).

And that's where I'm at! 

Next up:
-Paint (I lost my paintbrushes, so I either need to buy more or figure out where I packed them.) I'm definitely going to use the same paint I used two years ago because I still stand by that choice. As long as I have enough of it left. 
-Find new screws for the gold (formerly black) knobs. The original ones stick out from the back of my box and definitely will not work. 
-Actually buy those pretty drawer pulls I have my heart set on from Hobby Lobby. I'm crossing my fingers that they are still there.